
Popcorn ceilings used to be all the rage. It was fast and easy for contractors to spray on the ceilings to cover up and imperfections in the ceiling. As the years progressed, more and more people find them off-putting and want them replaced with more modern looking ceilings.
Tired of staring at your ugly ceilings and wondering if that is a spider on your ceiling or just some dirt? Luckily, there are 7 easy steps that we have found from the top experts to make it fast, fun, and painless to re-do. If you need help, call us and we will be happy to provide a quote.
Tired of staring at your ugly ceilings and wondering if that is a spider on your ceiling or just some dirt? Luckily, there are 7 easy steps that we have found from the top experts to make it fast, fun, and painless to re-do. If you need help, call us and we will be happy to provide a quote.

How to Guide:
1. Get the right tools
2. Prep the room
3. Spray
4. Scrape
5. Sand
6. Apply New Texture
7. Paint
2. Prep the room
3. Spray
4. Scrape
5. Sand
6. Apply New Texture
7. Paint
Step 1: Get the right tools
Getting the right tools for the right job is an important step to being successful. Depending on your budget there are several types of tools that the experts recommend. Some of these you might have already, need to buy, or can get creative.
Painter's Tape: Painter's tape and plastic will be used to protect your walls, floor, and anything that the old popcorn ceiling can fall onto. If you already have some laying around, great. Otherwise we have a few suggestions here.
Painters Plastic: With the tape, this will be used to create a barrier in your room to keep everything safe, dry, and easy clean up. A little prep work goes a long way in having a successful project.
Knife/Scraper: A common mistake is to get too small of a scraper. We recommend getting two different sizes. One for the majority of the ceiling and a smaller one to get the finer edges.
Stilts or ladder: Depending on the ceiling height, a small step stool or ladder to reach the ceiling is required. To make work even faster, getting stilts will allow you to walk around the room instead of constantly moving the ladder.
Sprayer: Water is recommended to spray the ceiling, trap dust, and make scraping a lot easier. Some DIYers use a spray bottle with water to saturate the ceiling. This is recommended for small projects like a single room. However, if you have multiple rooms, we recommend either a pump sprayer or paint sprayer using only water.
Sander: After the popcorn ceiling is removed, the ceiling may needed to be sanded to prep for the new texture and paint
Paint: A good ceiling paint and primer will put the finishing touches on your new ceiling
*Pro Tip: If you have a wet-vac laying around, some pros have recommended attaching the hose of the wet-vac to the scraper to suck up all the debris while you are scraping. This can help substantially with clean up.
Step 2: Prep the room
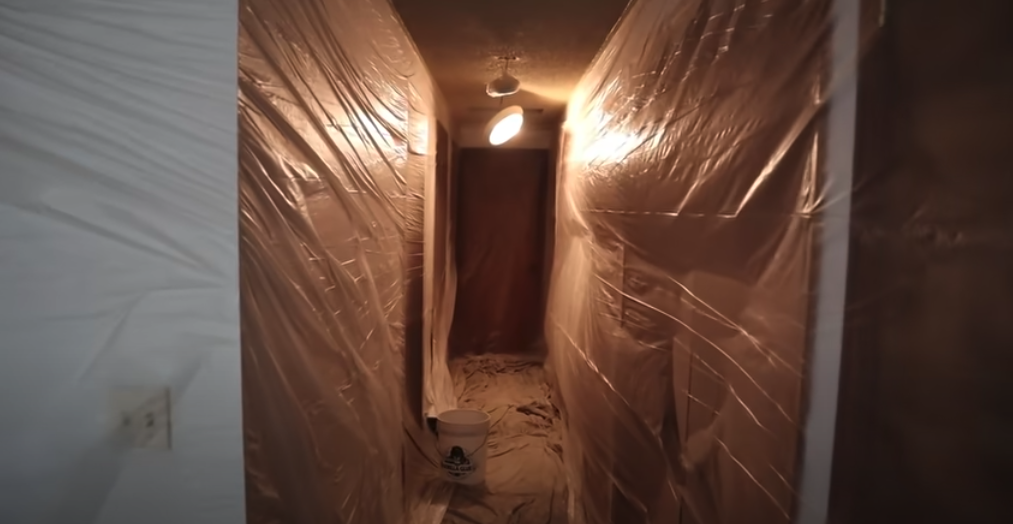
Properly preparing the room is essential in making cleanup a breeze. Imagine, a whole ceiling's worth of paint, texture, mud, and water will be flying off the ceiling. It needs to land somewhere. By not covering all the walls, floors, fans, and more you will have a huge mess on your hands. It definitely would take longer to clean up. Instead, just cover everything in the room. Move large and small items out. Cover everything else you can't move.
Starting from the top of the ceiling, use the painter's tape and plastic to create a protective wall to the ground. Any ceiling fixtures should probably be either removed or covered with plastic as well. Remove any window treatments if they can't be covered with the plastic. Finally, lay a plastic or drop cloth on the floor to protect and catch all the falling debris.
There are a few approaches if you are doing the whole house vice just a single room. Either divide the house in segments or move as you work.
If you divide the house into segments, move all the large items from one side of the house to the other. Or from the upstairs to the downstairs. This will help protect items from not getting hit with the wet debris falling from the popcorn ceiling. When the ceiling is completely cleared, cleaned, and painted. Then move onto the next segment of the house. Moving items back to their original places and from the other rooms to the newly done rooms.
Another approach is to keep most item in their place and cover with lots of plastic. Any electronics, books, delicate items should be properly moved or stored. This is a faster approach but will require more prep time with laying the plastic sheets and making sure no debris can enter.
Once the prep work is done, we move onto the next step.
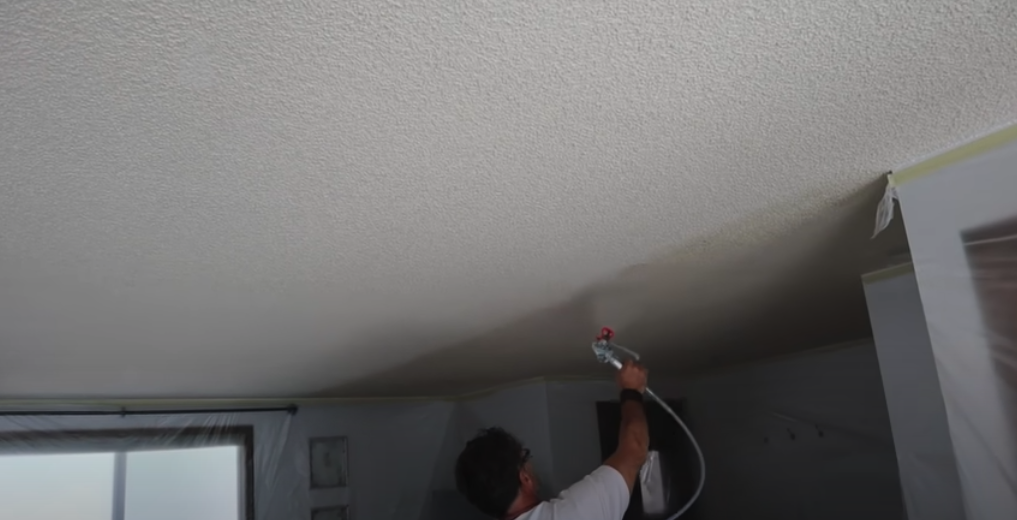
Step 3: Spray
In order to remove popcorn ceilings, water has been used to make the job a lot easier. If you just scrape while the popcorn is dry, it will take more effort and create lots of dust. The experts don't recommend mixing water with anything, just plain tap water will work. Once the water comes into contact with the ceiling, the water will permeate and loosen up the popcorn ceiling. Careful, too much water can get into the drywall and not enough water won't do the trick. To get a sense for how much water you need, start with a small section of the ceiling and work your way out.
Some of the techniques to spray the water onto the ceiling is using spray bottles, pump sprayer, or even a paint sprayer (obviously without the paint!). Spray bottles are only recommended for a small spaces because they don't emit enough water.
Spray in a uniform pattern on the ceiling using the Z pattern. You should be able to see the ceiling color visibly darken from the water compared to the dry portion of the ceiling. Wait a few minutes for the water to soak and then you are ready for the next step.
Step 4: Scrape
This is arguable the most satisfying part of the process. Scraping all the popcorn off the ceiling. After the ceiling has been doused with a good amount of water grab your knife/scraper. We've tested a 24" drywall knife and that seems to work great. Experts recommend a short handled as opposed to an extending drywall knife. Reason be that any extra pressure or angling of the extended knife can gouge and damage the ceiling.
Grab your stilts or ladder and get close to the ceiling to have a comfortable position. You should hold the knife or scraper so that there is only a shallow angle between the ceiling and knife. Too large an angle can damage the ceiling. Imagine shaving butter with shallow strokes instead of deep, damaging patterns. If you have applied enough water, the popcorn ceiling should come off as smooth as butter when you glide it across the ceiling. If it's difficult or even painted popcorn, you might need to apply some more water to the ceiling.
Some things to watch out for. If you come across a drywall joint. Where two drywall pieces are taped together. Make sure you don't scrape off the tape. If the tape does come off, try to reapply the tape. Also, when getting close to the wall, a smaller knife might be easier. If the larger knife works, great. Otherwise, pairing down to a smaller size allow for more accurate scraping.
When the entire ceiling is done you should have a nice smooth surface with a little texture still on the ceiling.
Step 5: Sand
To fully get off the old texture and prepare for new texture and paint, sanding the surface is a great idea. Sanding the ceiling can prep your ceiling to allow the next material to stick to the surface. Don't use a fine sander, just a rough sander will get the texture off and prep the ceiling.
There are multiple types of sanders, find one that best fits your budget, what you have on hand, or how much time you want it to take. The best is an extendable, large surface sander. That way you can safely sand while standing on the ground. Make sure to wear a mask to prevent breathing dust in.
There are multiple types of sanders, find one that best fits your budget, what you have on hand, or how much time you want it to take. The best is an extendable, large surface sander. That way you can safely sand while standing on the ground. Make sure to wear a mask to prevent breathing dust in.
Step 6: Apply New Texture
There are a few ways to apply next texture on to the ceiling. First, you need to decide what type of texture you want on the ceilings. While there are lots of options to choose from, we picked the three most popular styles: knockdown, orange peel, and smooth texture.
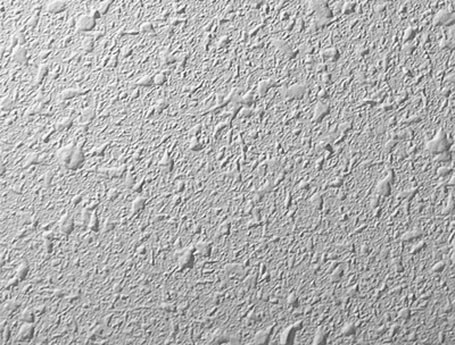
Knockdown
Knockdown is one of the most popular choices. Compared with orange peel, knockdown has wider patterns and texture. It has a smooth texture, easy of the eyes, and covers up and imperfections on the ceiling. It is made by laying a plaster base and then slightly tapping all around the surface with a soft sponge or brush.
There are knockdown tools to create the varied patterns on the ceilings and flatten any uneven or sharp edges. Instead of a knockdown tool, you could use a knife, scraper, or trowel but with light pressure. You are only flattening the protruding patterns and not making a smooth ceiling.
|
|
|
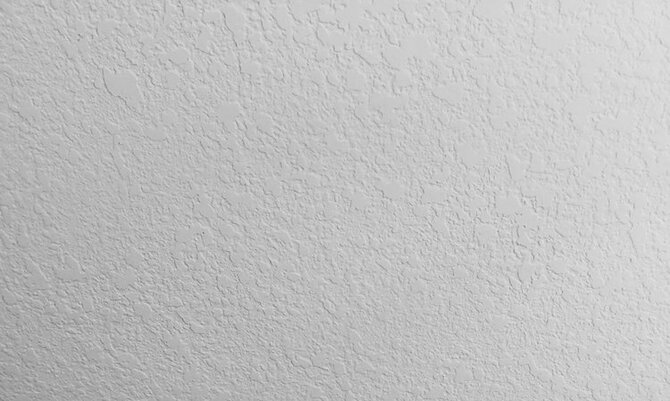
Smooth Ceiling Texture
This is another popular type of ceiling that is probably the easiest to apply. If you already have relatively smooth ceiling after removing the popcorn this might work. All you need is a smooth texture to roll onto the ceiling. After the ceiling is dry, you are ready to paint. A trowel might be useful to make sure you get the ceiling evenly textured and no bumps are created.
This is another popular type of ceiling that is probably the easiest to apply. If you already have relatively smooth ceiling after removing the popcorn this might work. All you need is a smooth texture to roll onto the ceiling. After the ceiling is dry, you are ready to paint. A trowel might be useful to make sure you get the ceiling evenly textured and no bumps are created.
|
|

|
Orange Peel
Much like the knockdown texture, orange peel is similar but with smaller sized shapes. Orange Peel is losing out in popularity towards more traditional smooth and knockdown ceilings. However, orange peel is pretty straightforward. You can buy a can of orange peel texture to spray the ceiling. Just spray it on in short bursts from a few feet away, dry, prime, and paint it.
*Pro Tip: To get practice, try spraying on a cardboard box to practice on the spraying and texture technique.
|
|
|
You may or not be comfortable texturing ceilings by yourself. If you need help, talk to one of our drywall expert
Step 7: Paint
After the texture is completely dry it's time to paint. Make sure to use a ceiling grade paint and grab a roller to help speed up the process. A brush will take way too long! When using a roller, ensure you are properly rolling the excess paint off the brush before you touch the ceiling. Excess paint will run or drip.
It should be noted that the plastic and drop cloth should still be up doing this crucial time. Paint can fall on the floor or drip down the wall. If you still have the plastic up, no need to worry.
It's also a good idea to get paint and primer. This is the first time that paint will touch the next texture and will need assistance with the primer to stick on the surface. That's it! Once you are done painting, let it dry and let the clean up process begin. It should be super simple to just take down the plastic and throw away. Leaving a fresh ceiling and a transformed room for you to enjoy.
At We Do Ceilings, we can match you with a local pro to remove your popcorn ceiling, re-texture, and paint your beautiful new ceilings.